Table of Contents
Good architecture makes the system easy to understand, easy to develop, easy to maintain, and easy to deploy
Robert C. Martin, Clean Architecture.
Uncle Bob’s quote is explaining itself, but what is good/ clean architecture? before talking about what we will build, let’s have a clear definition of clean architecture.
Clean Architecture is a software design approach that separates the software system into layers, each with a specific purpose and responsibility. The main goal of Clean Architecture is to allow for independent development, testing, and deployment of each layer, resulting in a system that is flexible and maintainable.
Throughout this series of articles, we will apply the clean architecture approach to build an AI Image Generator using Flutter and DALL·E 2 API.
So without further ado let’s get into it.
01
of 07
Clean Architecture Diagram in Flutter
The diagram below shows the different layers the application should have to follow the clean architecture approach. First, we have the Data layer which is the layer that deals with data retrieval and storage. It has:
- Data Sources: They might be remote such as API, Firebase, or any data hosted on a server, or locally such as databases, and caching.
- Models: Represent the data structures used in the application. They might be similar to entities but can also include data transformation logic.
- Repositories: Implement the repository interfaces defined in the Domain Layer and leverage data sources through dependency injection (DI).
The Domain Layer is the core business logic layer. It contains entities, use cases, and repositories(contracts, abstraction for repositories in the data layer):
- Entities: Represent the core business objects, functioning independently of user interface (UI) concerns.
- Use Cases: Contain application-specific business rules, and functionalities and interact with repositories(in the same layer).
- Repositories ( only Abstraction): Define contracts repositories Data Layer must implement. They act as gateways for Domain Layer accessing data without knowing the source.
The Presentation Layer contains the UI components and controllers. It’s responsible for handling user interactions and displaying data:
- UI/ Screens: Displays widgets and captures user input.
- Controllers: Respond to user interactions, manage UI state, and call use cases from the Domain Layer.
- Widgets: are optional but it is good to have reusable components that can be used in multiple places in your app.

What we discussed above can be represented in your Flutter lib project as below:
we used a feature-first (layer inside features) approach which means we create a new folder for every feature we add to our app. And inside that folder, we can add the layers themselves as sub-folders. In the app, we’re going to build we have only one feature we can call images because the app only generates images. Later when we add AdMob Ads to this app we will create another feature, ads. But in general, the folder representation of your project should be something like this:
lib/
|-- feature_one/
|   |-- presentation/
|   |   |-- controllers/
|   |   |-- screens/
|   |   |-- widgets/
|   |
|   |
|   |-- domain/
|   |   |-- entities/
|   |   |-- usecases/
|   |   |-- repositories/
|   |
|   |-- data/
|       |-- models/
|       |-- repositories/
|       |-- datasources/
|
|-- main.dart
02
of 07
Data Flow Between Layers
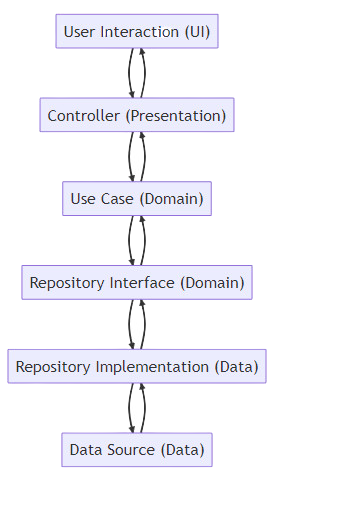
Now we have a clear vision of the architecture of the Flutter app, and the different layers, you might be wondering how these layers will communicate with each other right?
Well, the first thing is the UI captures the user inputs/ actions and passes them to the controllers in the Presentation layer, the controllers, then, call the appropriate use cases from the Domain Layer passing the necessary data, the use cases contain the business logic, and they interact with the Repository interfaces/ abstract classes to fetch or store data. The Repository Interfaces forward data requests to actual Repository implementations in the Data layer which interact with Data Sources to retrieve or store data, performing necessary transformations.
Lastly, the Data Sources handle the data retrieval from various sources (APIs, databases, caches) and pass it back to Repositories.
The flow reverses, with data moving back up through the layers. Repositories pass data to Use Cases, which can transform it if needed.
The Use Cases provide the transformed data to Controllers, which update the UI components with the new information reflecting the data to the end user.
03
of 07
What will we build?
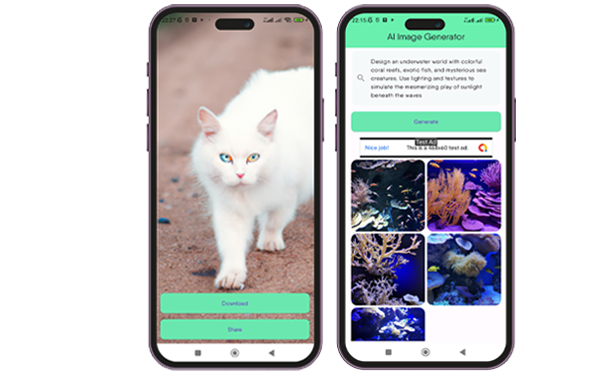
we’re heading to the stage of what coming next. the exciting part! to apply the theory we discussed earlier, and to get our hands dirty, we will build an AI image generator where the user can enter a prompt describing the image they want and get back the result of up to 10 images, for the sake of the tutorial and due to the rate limit because we use the free trial of the DALL·E 2 we will be satisfied with 5 images. The below screens showcase the app we’re going to build.
so without any further delay let’s jump right in!
04
of 07
Install the necessary dependencies
for this project we will need some dependencies that can be installed from pub.dev:
  dart_openai: ^4.0.0
  envied: ^0.3.0+3
  flutter_bloc: ^8.1.3
  image_gallery_saver: ^2.0.3
  dio: ^5.3.0
  share_plus: ^7.0.2
  path_provider: ^2.0.15
- dart_openai: to interact with DALLE API.
- envied: to load the API key from the .env file avoiding exposing the API key in the source code.
- flutter_bloc: from managing the state.
- image_gallery_saver: to save the images in the user’s device.
- dio: for dealing with network requests.
- share_plus: for sharing images on different social media platforms.
- path_provider: helper to access file system locations such as the temporary directory.
05
of 07
Create a new Flutter project and set up the necessary folders
Let’s create a new Flutter project, by running the command flutter create followed by the project name.
flutter create ai_image_generator
Now let’s head to OpenAI API, create an account and get your API key, initially, you will get $5 credits to use when you sign up.
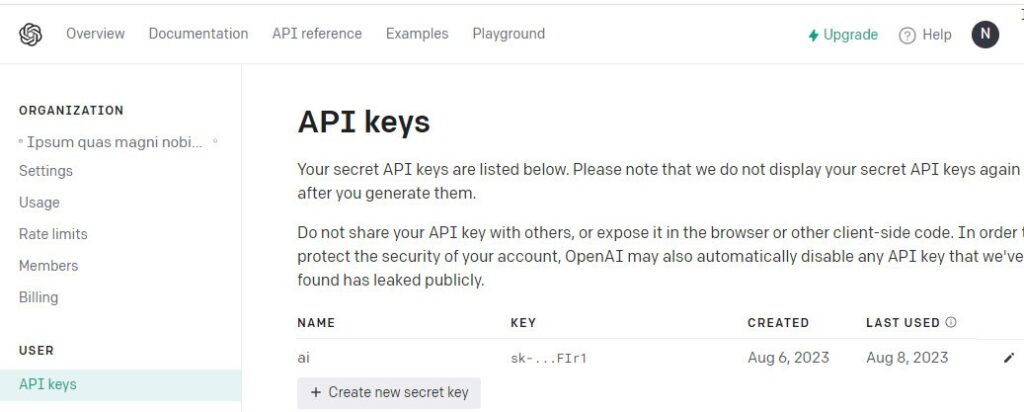
now create a .env file in the project’s root and paste the key inside it.
after that clean up the project and inside the lib folder create the folder structure we discussed earlier.
lib/
|-- env/
|    |-- env.dart
|    |-- env.g.dart
|-- images/
|   |-- presentation/
|   |   |-- controllers/
|   |   |-- screens/
|   |   |-- widgets/
|   |
|   |
|   |-- domain/
|   |   |-- entities/
|   |   |-- usecases/
|   |   |-- repositories/
|   |
|   |-- data/
|       |-- models/
|       |-- repositories/
|       |-- datasources/
|
|-- main.dart
add another env folder where we will deal with the .env API key.
create an env.dart file with the class to load the API key from the .env file.
import 'package:envied/envied.dart';
part 'env.g.dart';

@Envied(path: ".env")
abstract class Env {
  @EnviedField(varName: 'OPEN_AI_API_KEY')
  static const apiKey = _Env.apiKey;
}
During the build process of the app, an env.g.dart will be created by reading the value in the .env file, and this value will get assigned to the API key file in the Env class.
if the env.g.dart doesn’t get generated for some reason, create one as follows.
part of 'env.dart';

class _Env {
  static const apiKey = 'API_KEY_ACTUAL_VALUE';
}
Now let’s work on the first Layer, the Domain Layer.
06
of 07
Domain Layer
Entities
We’re interested only in the image URL from the API response.
so our entity will have only the image URL String.
in the entities folder, we create an image_entity.dart file with the ImageEntity class:
class ImageEntity{
  final String imageUrl;
  ImageEntity(this.imageUrl);
}
Repositories
In the repositories folder we will have an image_repository.dart file with the ImageRepository abstract class:
this abstract class will be implemented in the data layer as discussed above.
it will have two methods:
- getImageByPrompt: takes a prompt and returns a Future List of ImageEntity, Future<List<ImageEntity>>.
- downloadImage: take the image URL and return a Future of Image File, Future<File>.
import '../entities/icon.dart';
import 'dart:io';
abstract class ImageRepository{
  Future<List<ImageEntity>> getImageByPrompt(String prompt);
  Future<File> downloadImage(String url);
}
UseCases
the usecases are the functionalities that the app will have. If we think for a second, our app will generate images by prompt and download images.
so we will have two use-cases:
let’s create get_image_by_prompt.dart file with the class GetImageByPrompt.
this class will have an instance of the ImageRepository that will be injected through the constructor of GetImageByPrompt.
By depending on the abstraction (ImageRepository), GetImageByPrompt doesn’t need to know the specific implementation details of data retrieval. Instead, it relies on the contract defined by the abstraction.
the GetImageByPrompt has a method getTheImageByPrompt that takes in the prompt and returns a Future<List<ImageEntity>>, this method calls the getImageByPrompt method from the ImageRepository instance passing in the prompt as follows:
import '../repository/image_repository.dart';
import '../entities/icon.dart';

class GetImageByPrompt{
  final ImageRepository imageRepository;
  GetImageByPrompt(this.imageRepository);
  Future<List<ImageEntity>> getTheImageByPrompt(String prompt){
    return imageRepository.getImageByPrompt(prompt);
  }
}
now let’s create the other use case to download the images, create download_image.dart file with a class DownloadImage, with an instance of the ImageRepository, achieving dependency injection as we did with the previous use case.
This class has a downloadImageByItsUrl method that takes the image URL and returns a Future<File>. inside the method, we call downloadImage from the ImageRepository instance passing in the URL.
07
of 07
Conclusion of Part 1
That’s pretty much it for this part, we talked and understood the clean architecture in Flutter, the data flow and call flow, and started working on the AI Image Generator App, by now we finished the first Layer, the Domain Layer, In the next upcoming article we will carry on and continue from where we left and start working on the Data Layer.
If you found this article helpful or have any thoughts, questions, or additional insights, I’d love to hear from you! Your feedback is incredibly important in helping me improve the quality of my content.
Found an error or want to add to the discussion? Please don’t hesitate to leave a comment below or reach out to me on LinkedIn.
Thank you for taking the time to read this article, Until next time, happy coding!




That’s nice! You made it really clear.
Excelente aporte
Thanks for your comment, interesting question.
For the continuation, I am working on the next articles, keep an eye on here 🙂
I agree with you on the part of saying that why I would create model if the api response matches my entity.
Well, it could be enough to use only the entity if you’re 100% sure that the api won’t change in the future.
But generally speaking, the models add an extra layer of abstraction and flexibility, they act as an intermediate between your API data and your domain entities.
This is can be helpful for several scenarios:
– Decoupling: if the api change in the future, the models can help you isolate the changes within the data layer preventing the domain layer logic of being affected by the api changes.
-Serialization: models help you convert the coming data to dart objects using factory constructor as you know.
-testing: models help you write units tests for the data layer ensuring the transforamtion and parsing are done correctly.
For a small application you won’t see the real value of clean architecture but once the project gets bigger it’s important to have a clean architecture to be able to maintain it.
Continuation article? I dived in because it’s intresting but stuck with article 1 .
I want to know how programmatically it’s making efficient of creating data , domain layers appart from presentation
One thing use full for testing but other options and model and entities are bit confusing me as the api gives same response , so then I have to use model when entity is enough to make the job done ✅. Because it’s an client project for solo purpose of one varient . There will be no free and paid version then I am forced to create same structure in model and entity folder is it good habit ?
You are not forced to create models or entities every time, it happens for some usecases that they don’t need an entity or a model.