


Table of Contents
Following part 1 and part 2 of building an AI Image Generator with Flutter Clean Architecture, in this part, we’ll work on the UI, If you followed along, by now we’re all set to generate the images and then download them. All the functionality is implemented.
I assume that you’re familiar with the widgets that will be used in building the screens so we’re not going to explain them in detail, However, we’ll focus on how to use the cubits, how to manage the different states to give a better user experience, and how to use the FadeInImage widget to display the images, using place holders before the images show up, and also handle image errors, if for any reason the images don’t show up.
Enough for an intro, we’ve a lot of work ahead, so let’s get started.
01
of 05
Assets
If you want to use the same image assets that I used you can download them from the following link.
and in your pubspec.yaml file add this:
  assets:
     - assets/
02
of 05
Widgets
Let’s start with the widgets that will be reused, in our case we have the button that will be used to generate images and download them so what will change is its child, which might be the title or a null value( unclickable while generating or downloading), and the callback that will be triggered when clicking the button.
so in the widgets folder create a file called reusable_button.dart with the ReusableButton StatelessWidget like so:
import 'package:flutter/material.dart';
class ReusableButton extends StatelessWidget {

  final VoidCallback? onPressed;
  final Widget child;
  const ReusableButton({super.key,required this.onPressed,required this.child});

  @override
  Widget build(BuildContext context) {
    return  Padding(
      padding: const EdgeInsets.only(left: 15.0,right: 15.0,top: 5.0,bottom: 10),
      child: SizedBox(
        width: double.infinity,
        height: 50,
        child: ElevatedButton(
            onPressed: onPressed,
            style: ElevatedButton.styleFrom(
              backgroundColor: Colors.greenAccent,
              shape: const RoundedRectangleBorder(
                  borderRadius:
                  BorderRadius.all(Radius.circular(10))),
            ),
            child:   child),
      ),
    );
  }
}
you can play around with its style the way you want but, I’m happy with it like this, let’s move on!
We will need some styling for the TextField that will be used to generate images so let’s have a separate InputDecoration method for that.
create an input_decoration.dart file with the getInputDecoration that will take in the hintext and iconData method as follows:
import 'package:flutter/material.dart';

InputDecoration getInputDecoration(String hintext, IconData iconData) {
  return InputDecoration(
    enabledBorder: const OutlineInputBorder(
      borderRadius: BorderRadius.all(Radius.circular(12.0)),
      borderSide: BorderSide(color: Colors.white, width: 2),
    ),
    focusedBorder: const OutlineInputBorder(
      borderRadius: BorderRadius.all(Radius.circular(12.0)),
      borderSide: BorderSide(color: Colors.white, width: 2),
    ),
    filled: true,
    prefixIcon: Icon(
      iconData,
      color: Colors.black38,
    ),
    hintStyle: const TextStyle(color: Colors.black54, fontSize: 14),
    hintText: hintext,
    fillColor: const Color(0xFFF5F9FA),
    contentPadding: const EdgeInsets.symmetric(vertical: 18, horizontal: 15),
  );
}
again, feel free to change the styling that will be applied to the TextField but this is already looking nice and consistent regarding the button.
03
of 05
Screens
With this out of the way let’s now create the home screen. In the screens folder create the home_screen.dart file with HomeScreen StatelessWidget like so:
import '../controllers/get_image/image_cubit.dart';
import '../controllers/get_image/image_state.dart';
import '../widgets/generate_images.dart';
import '../widgets/reusable_button.dart';
import 'package:flutter/material.dart';
import 'package:flutter_bloc/flutter_bloc.dart';
import '../../data/data_source/remote_datasource.dart';
import '../../data/repository/image_repository.dart';
import '../widgets/input_decoration.dart';

class HomeScreen extends StatelessWidget {
  HomeScreen({super.key});

  final _promptController = TextEditingController();
  final ImageCubit imageCubit =
  ImageCubit(ConcreteImageRepository(RemoteDataSource()));

  @override
  Widget build(BuildContext context) {
    return BlocProvider<ImageCubit>(
      create: (context) => imageCubit,
      child: Scaffold(
        appBar: AppBar(
          title: const Text("AI Image Generator"),
          centerTitle: true,
          backgroundColor: Colors.greenAccent,
        ),
        body: BlocBuilder<ImageCubit, ImageState>(builder: (context, state) {
          return Column(children: [
            Padding(
              padding: const EdgeInsets.only(
                  left: 15.0, top: 5.0, right: 15.0, bottom: 8.0),
              child: TextField(
                minLines: 1,
                maxLines: 5,
                style: const TextStyle(fontSize: 14),
                decoration: getInputDecoration(
                  'A white bird flying in a volcano',
                  Icons.search,
                ),
                keyboardType: TextInputType.text,
                onChanged: (value) {
                  _promptController.text = value;
                },
              ),
            ),
            ReusableButton(
                onPressed: (state is ImageIsLoading)
                    ? null
                    : () {
                        FocusScope.of(context).unfocus();
                        final iconCubit = BlocProvider.of<ImageCubit>(context);
                        iconCubit.getImage(_promptController.text);
                      },
                child: (state is ImageIsLoading)
                    ? const CircularProgressIndicator()
                    : const Text("Generate")),
            Expanded(child: const GenerateImages()),
          ]);
        }),
      ),
    );
  }
}
we have the _promptController variable to hold the prompt the user enters and an ImageCubit instance.
In the build method, we return the BlocProvider which provides the ImageCubit instance to the widget tree.
In the body, we have the BlocBuilder which is used to build a part of the UI in response to the changes in the state of the Cubit( ImageCubit in our case).
BlocBuilder<ImageCubit, ImageState> this specifies the type of Cubit we want to listen to (ImageCubit) and the type of state it emits( ImageState).
The builder: (context, state) { ... } callback function gets executed whenever the state of ImageCubit changes, it takes in two parameters, the context which is the build context, and the state, which is the last state emitted.
the builder returns a column with the TexField with the getInputDecoration decoration we created earlier.
below it we have the button to generate the images.
 ReusableButton(
                onPressed: (state is ImageIsLoading)
                    ? null
                    : () {
                        FocusScope.of(context).unfocus();
                        final imageGenerationCubit = BlocProvider.of<ImageCubit>(context);
                        imageGenerationCubit.getImage(_promptController.text);
                      },
                child: (state is ImageIsLoading)
                    ? const CircularProgressIndicator()
                    : const Text("Generate")),
checking the state, if the state is ImageIsLoading we assign null to the onPressed function to prevent the user to keep clicking and sending multiple requests to the DALL·E 2 API while the image generation is taking place.
otherwise, we have the callback function with an instance retrieved from the ImageCubit and call on it the getImage passing in the prompt.
in the child, we check the state and if it’s ImageIsLoading we have a CircularProgressIndicator otherwise the text “Generate”.
Below the TextField and the Button, we have a GenerateImages widget inside and an expanded widget. This widget is the one that’s going to have the generated grid view images.
so in the widgets folder, create a generate_images.dart file with the GenerateImages StatelessWidget.
import 'package:flutter_bloc/flutter_bloc.dart';
import 'package:flutter/material.dart';
import '../controllers/get_image/image_cubit.dart';
class GenerateImages extends StatelessWidget {
  const GenerateImages({super.key});

  @override
  Widget build(BuildContext context) {
    final imageCubit = BlocProvider.of<ImageCubit>(context);

    return MultiBlocProvider(
      providers: [
        BlocProvider.value(value: imageCubit),
      ],
      child: const BuildImageWidget(),
    );
  }
}
In the build method, we define the imageCubit variable and assign the ImageCubit instance obtained using the BlocProvider.of method from the given context.
we return MultiBlocProvider with a providers parameter that takes a list of BlocProviders.
we used MultiBlocProvider because we will need another BlocProvider in the widget tree when we add AdMob ads in another tutorial .
In the child of the MultiBlocProvider, we have the BuildImageWidget, so in the same file create a StatefulWidget called BuildImageWidget.
import '../controllers/get_image/image_state.dart';
import '../screens/full_image_screen.dart';
import 'package:flutter_bloc/flutter_bloc.dart';
import 'package:flutter/material.dart';
import '../controllers/get_image/image_cubit.dart';

class BuildImageWidget extends StatefulWidget {
  const BuildImageWidget({super.key});

  @override
  State<BuildImageWidget> createState() => _BuildImageWidgetState();
}

class _BuildImageWidgetState extends State<BuildImageWidget>
{
  @override
  Widget build(BuildContext context) {
    return BlocBuilder<ImageCubit, ImageState>(
      builder: (context, state) {
        if (state is ImageLoaded) {
          final List<ImageEntity> images = state.loadedImages;

          return Container(
            margin: EdgeInsets.symmetric(vertical: 5, horizontal: 15),
            child: ListView(
              physics: BouncingScrollPhysics(),
              children: [
                SizedBox(
                  height: 5.0,
                ),
                GridView.builder(
                  itemCount: images.length,
                  itemBuilder: (BuildContext context, int index) => InkWell(
                    onTap: () {
                       Navigator.push(
                          context,
                          MaterialPageRoute(builder: (context) => FullImageScreen(imageUrl: images[index].imageUrl)),
                        );
                    },
                    child: Hero(
                      tag: images[index].imageUrl,
                      child: ClipRRect(
                        borderRadius: BorderRadius.circular(15),
                        child: FadeInImage(
                          fit: BoxFit.cover,
                          placeholder: const AssetImage('assets/loading.gif'),
                          image: NetworkImage(images[index].imageUrl),
                          imageErrorBuilder: (context, error, stackTrace) {
                            return ClipRRect(
                                borderRadius: BorderRadius.circular(15),
                                child: Image.asset(
                                  'assets/placeholder_image.png',
                                  fit: BoxFit.cover,
                                ));
                          },
                        ),
                      ),
                    ),
                  ),
                  physics: BouncingScrollPhysics(),
                  shrinkWrap: true,
                  gridDelegate: SliverGridDelegateWithFixedCrossAxisCount(
                    crossAxisCount: 2,
                    crossAxisSpacing: 5.0,
                    mainAxisSpacing: 5.0,
                  ),
                ),
              ],
            ),
          );
        } else if (state is ImageError) {
          return Padding(
            padding: const EdgeInsets.all(20.0),
            child: Center(
                child: Text(
              state.errorMessage,
              textAlign: TextAlign.center,
            )),
          );
        } else {
          return Center(
              child: SingleChildScrollView(
            child: Column(
              mainAxisAlignment: MainAxisAlignment.start,
              children: [
                Image.asset(
                  "assets/placeholder.png",
                  width: 300,
                  height: 300,
                ),
                const Text(
                    "Start Generating Images By Typing an Image Description"),
              ],
            ),
          ));
        }
      },
    );
  }
In the build method, we return a BlocBuilder with the ImageCubit and ImageState, and in the builder callback, we check the state. If the state is ImageLoaded, we take the images from it and return a container with the ListView as its child.
Inside the ListView we have a GridView, in its itemBuilder, we have the following:
                 InkWell(
                    onTap: () {
                       Navigator.push(
                          context,
                          MaterialPageRoute(builder: (context) => FullImageScreen(imageUrl: images[index].imageUrl)),
                        );
                    },
                    child: Hero(
                      tag: images[index].imageUrl,
                      child: ClipRRect(
                        borderRadius: BorderRadius.circular(15),
                        child: FadeInImage(
                          fit: BoxFit.cover,
                          placeholder: const AssetImage('assets/loading.gif'),
                          image: NetworkImage(images[index].imageUrl),
                          imageErrorBuilder: (context, error, stackTrace) {
                            return ClipRRect(
                                borderRadius: BorderRadius.circular(15),
                                child: Image.asset(
                                  'assets/placeholder_image.png',
                                  fit: BoxFit.cover,
                                ));
                          },
                        ),
                      ),
                    ),
                  ),
the Inkwell widget is used for clicking each image to go to the full image screen( we’ll on the full image screen in part 4). The Hero widget is for achieving an animation transition when we pop back from the full image screen.
the ClipRRect widget is used to have border-radius to images, its child has the FadeInImage with the placeholder which is an asset image, the actual image accessed by the index, and we handle any image load error by returning a placeholder image instead of displaying the error on the screen.
The assets for this project can be downloaded above in the assets section.
Moving on, if the state is ImageError, we display the custom error messages to the user.
otherwise, we display an image with the text “Start Generating Images By Typing an Image Description”.
04
of 05
Result
By now you have created the app in the screen below that is fully functional.
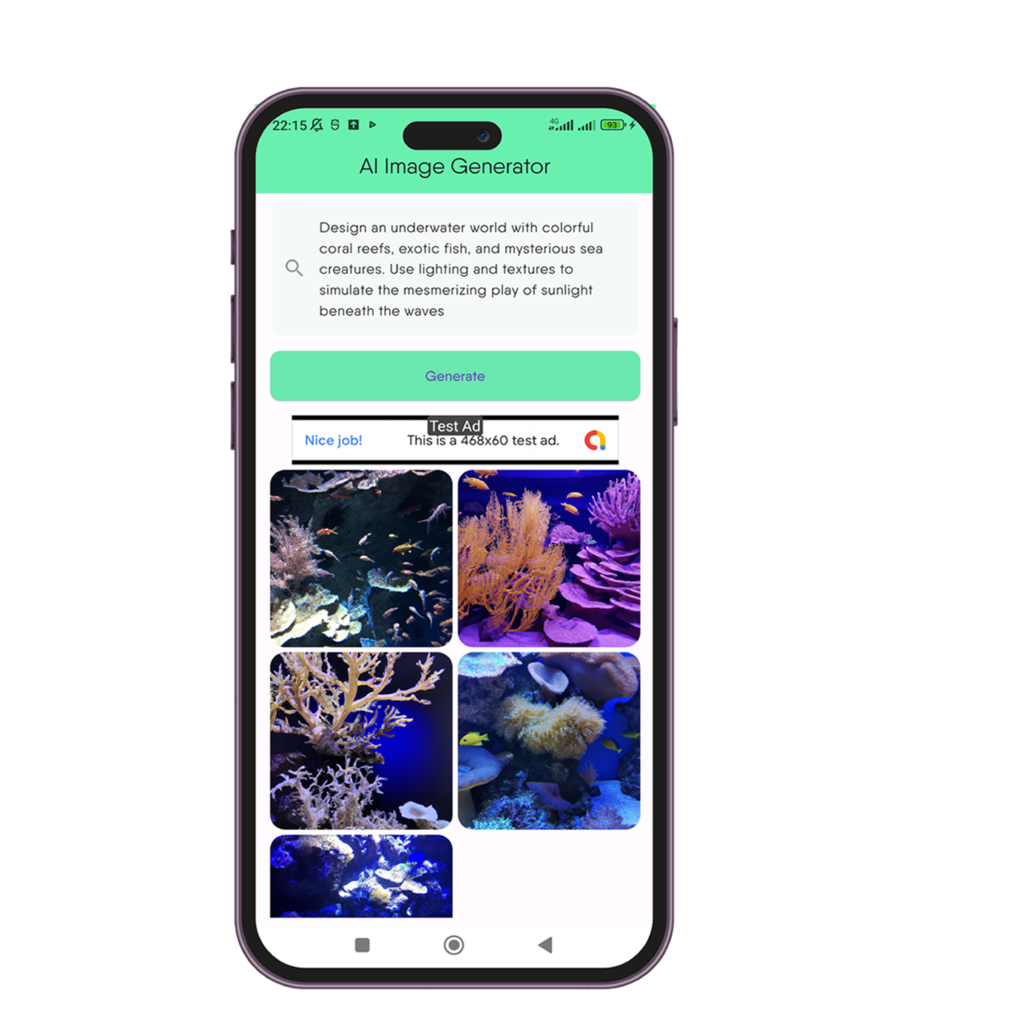
The test ad that’s showing up on the screen, won’t work on the app we built, however, later in another tutorial we will implement it.
05
of 05
Conclusion of Part 3
If you followed up at this point, that’s great! we still have to work on the entire image screen where we can view the image, download it or share its link.
I hope this tutorial gives you an understanding of clean architecture in Flutter.
If you found this article helpful or have any thoughts, questions, or additional insights, I’d love to hear from you! Your feedback is incredibly important in helping me improve the quality of my content.
Found an error or want to add to the discussion? Please don’t hesitate to leave a comment below or reach out to me on LinkedIn.


